
Repotting an orchid can feel like surgery for your delicate plant and is nerve-wracking and a little intimidating. But here’s the truth: it’s one of the most important things you can do to keep your orchid healthy and thriving.
In this guide, I will walk you through everything you need to know when it’s time to repot an orchid, how to choose the right type of bark, a step-by-step process you can actually follow, and the aftercare that helps your orchid settle in happily.
If you’re a beginner, don’t worry; this is written with you in mind. By the end, you’ll feel confident that repotting isn’t just doable; it’s the key to keeping your orchid alive for years to come.
Why Repotting Orchids with Bark Is Essential for Healthy Growth
Orchids aren’t like your average houseplant. In nature, most orchids are epiphytic plants that grow attached to trees, clinging to bark and branches rather than sinking their roots into soil. Their roots are designed to grab onto rough surfaces, absorb moisture from rain, and breathe in plenty of fresh air.
That’s why regular potting soil is a death sentence for orchids. Soil packs too tightly around their roots, trapping water and cutting off airflow. The result? Suffocated roots, excess moisture, and often, dreaded root rot.
Bark-based potting mixes, on the other hand, recreate the orchid’s natural environment. The chunky pieces of bark form air pockets, letting roots “breathe” while still providing enough structure to hold the plant upright. They drain quickly but also hold just enough moisture to keep the orchid hydrated, a perfect balance between air and water.
Best Types of Bark for Orchids
Pine Bark
Pine bark, often sourced from Monterey pine (Pinus radiata) in New Zealand, has become a popular orchid medium. It’s slightly more acidic than fir bark, which some orchids appreciate, and it has a reputation for being tough and long-lasting. Unlike softer mixes, pine bark breaks down very slowly, meaning you won’t need to repot as often.
Its outer surface softens over time to hold water and nutrients, while the inner structure stays firm and stable. This combination makes it a reliable choice if you want a low-maintenance medium that won’t collapse into soggy dust after just a year.
Fir Bark
Fir bark is the classic go-to in the United States. It’s widely available, affordable, and perfectly suitable for orchids of all kinds. Fir bark has a slightly lower pH than pine, making it a good neutral option if you’re not sure what your plant prefers.
While it may break down a little faster than pine bark, it’s still highly effective at balancing moisture and airflow. For many home growers, fir bark is simply the easiest and most convenient option.
When to Repot Your Orchid
Best Time to Repot
The ideal season for repotting an orchid is late winter to early spring. At this stage, orchids are typically winding down from their bloom cycle and gearing up for fresh root growth.
The best indicator isn’t just the calendar, though it’s the plant itself. Look closely at the base of your orchid. If you see new roots with bright green tips starting to emerge, you’ve hit the sweet spot. Repotting during this window allows the plant to settle quickly into its new home and establish strong and healthy roots.
Signs It’s Time to Repot your orchid
Even if the season is right, your orchid will usually give you clear signals that it’s ready (or overdue) for a fresh start:
- Decomposed bark: Bark naturally breaks down into smaller, soggy pieces over time. If your mix looks more like mulch than bark chips, it’s holding too much water and starving the roots of air.
- Overcrowded roots: Roots are spilling over the pot’s edges or crammed so tightly that there’s no room for new growth.
- Poor drainage: You notice water sitting in the pot or tiny fragments of bark washing out during watering.
- Newly purchased orchids: Orchids sold in stores are often potted in sphagnum moss. After they finish flowering, it’s best to switch them into bark for long-term health.
When to Avoid Repotting
Try not to repot while your orchid is blooming or producing a flower spike. Repotting during this stage can stress the plant, leading to dropped buds or shorter-lasting flowers. The only exception: if the orchid is in severe decline from root rot or fully broken-down media, repotting is necessary despite the bloom.
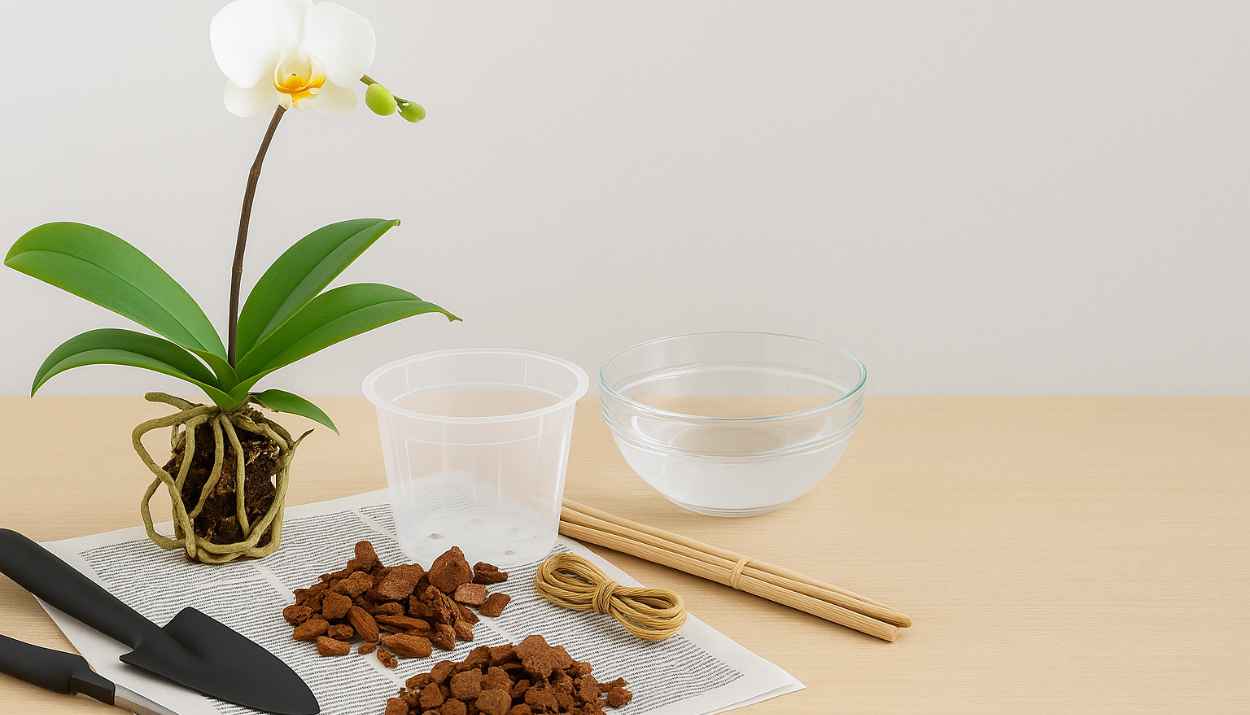
Tools and Supplies You’ll Need
Before you start, gather everything you’ll need. Having your tools ready makes the process smoother and less stressful for both you and your orchid.
- Fresh orchid bark: Choose the right grade (fine, medium, or coarse) depending on your orchid’s root size. Rinse it first to remove dust and small particles.
- Sterilized scissors or pruning shears: Essential for trimming damaged or rotting roots. Always sterilize before and after use to prevent spreading disease.
- Clear pot with drainage holes: Transparent pots let you monitor root health and moisture levels. Drainage holes ensure water flows freely and prevent root rot.
- Disinfectant and water: Use 70% isopropyl alcohol, a mild bleach solution, or flame to sterilize tools. Keep lukewarm water on hand for rinsing roots and soaking bark.
How to Repot an Orchid with Bark (Step-by-Step)
Step 1: Preparation
Start by setting up a clean workspace. Lay down newspaper or towels to catch bark pieces and stray roots.
If your bark is dry, rinse or soak it in lukewarm water to remove dust and make handling easier.
Next, sterilize your scissors or pruning shears using alcohol, flame, or bleach solution. This step is non-negotiable; dirty tools spread disease.
Finally, check that your new pot has adequate drainage holes. Orchids hate “wet feet,” so the more drainage, the better.
Step 2: Remove Orchid from Pot
Before you try to tug the plant free, soak the orchid (still in its pot) in lukewarm water for 5–10 minutes. This softens the roots and loosens the media.
- Plastic pots: Gently squeeze the sides to loosen the roots.
- Terracotta pots: Wet the entire pot thoroughly and carefully slide the plant out.
If roots are clinging tightly, don’t force them; use a smooth, thin tool to help free them.
Step 3: Clean and Inspect Roots
Shake off as much of the old bark as possible. Use your fingers to gently tease away stubborn pieces, then rinse the roots under lukewarm water.
Now take a close look at the root system: this is your chance to spot problems and give your orchid a clean slate.
Step 4: Trim Damaged Roots

Healthy orchid roots should be:
- White or pale green
- Firm and plump to the touch
- Turning bright green when watered
- Showing green tips (new growth)
Unhealthy roots are easy to spot: they are brown, mushy, hollow, blackened, or shriveled.
Use your sterilized scissors to remove only the damaged portions, making clean cuts. Trim overly long roots if needed, but leave at least 10 cm (4 inches) of healthy root wherever possible.
Step 5: Choose the Right Pot Size
Pick a pot that’s just slightly larger than the root system. Going too big is a mistake. Oversized pots hold excess moisture and increase the risk of rot. Clear plastic pots are ideal because they let you see both root health and moisture levels.
Step 6: Add Fresh Bark Medium
Place the largest bark chunks in the bottom of the pot to encourage drainage. Position your orchid so the base of the plant sits level with or just above the pot rim.
Gently fill around the roots with fresh bark, tapping the pot lightly to help the pieces settle. Press down just firmly enough to anchor the plant, but don’t overpack. The orchid should feel stable without being suffocated.
Step 7: Final Positioning
The crown (where leaves meet roots) should sit above the media line, never buried. A few exposed roots at the base are perfectly normal; orchids actually like it that way. Any aerial roots should remain above the bark where they can breathe freely.
Orchid Care After Repotting
Repotting is only half the job; what you do afterward can make the difference between a thriving orchid and one that struggles. Here’s how to give your plant the best start in its new bark home.
Immediate Watering Tips
There’s some debate about watering right after repotting. A good rule of thumb:
- If you trimmed a lot of roots: Wait 3–7 days before watering. This gives the cut ends time to heal and lowers the risk of rot.
- If you removed very few roots: You can water lightly right away, especially if the bark was pre-soaked.
When you do water, do it thoroughly. Run lukewarm water through the pot until it drains freely, ensuring all the bark is moistened. Never let the pot sit in standing water.
Light and Misting for the First Two Weeks
Repotting can stress orchids, so ease them into recovery mode:
- Place the plant in slightly lower light than usual for 2–3 weeks. Indirect, bright light works best during this adjustment period.
- Mist the leaves very lightly in the morning if your home is dry, but avoid overdoing it the leaves should be dry by evening to prevent disease.
- Check stability: the orchid should remain firm in the pot. If it wobbles, gently add more bark to secure it.
Long-Term Care
Once your orchid settles in, normal care resumes:
- Watering: Fresh bark dries out faster than old, broken-down bark. This means you’ll likely need to water more frequently in the beginning. Always check the roots; green means hydrated, and silver/white means thirsty.
- Root monitoring: Clear pots make it easy to see if roots are plump and healthy. New green tips are a sure sign your orchid is thriving.
- Routine repotting: Plan to repot every 1–2 years, or sooner if the bark starts breaking down.
Conclusion
Repotting an orchid may seem intimidating at first, but it’s one of the best investments you can make in your plant’s long-term health. With the right timing, the proper tools, and a step-by-step process, even beginners can do it successfully.
Remember: repotting isn’t just about giving your orchid a new pot; it’s about refreshing its environment so it can breathe, grow, and thrive. A freshly repotted orchid isn’t just healthier; it’s set up to flourish for years to come.
Frequently Asked Questions
How long do you soak orchid bark before repotting?
It’s best to soak orchid bark for a few hours, ideally overnight, before repotting. This helps the bark absorb water, making it easier to handle and ensuring it provides initial moisture for the roots. If you’re short on time, even 30 minutes of soaking is better than using it completely dry.
Can I plant my orchid in just bark?
Bark is one of the best media for orchids, especially for epiphytic species like Phalaenopsis. Bark mimics their natural habitat, giving roots the airflow and drainage they need. Just remember bark dries faster than moss, so adjust your watering schedule accordingly.
Is it better to repot orchids with moss or bark?
Both moss and bark can work, but bark is generally better for long-term orchid health. Moss retains more water, which can be risky for beginners since it’s easy to overwater and cause root rot. Bark offers better airflow and drainage, making it the safer choice for most home growers.